Using Speaker Select
If you've configured the supervisord correctly, the application scripts should run upon a reboot. Once the system is up and running, you should be able to access the WebUI via a browser on your smart phone, tablet or PC device.
Simply navigate to the IP address of your device for example (you can usually find the IP address of your device from looking at your router's configuration/status pages). My router typically assigns IPs with prefixes of 192.168.10.XXX. I'll use examples on my home network here, so you'll see URLs like: http://192.168.10.42 Yours may look different depending on your routers firmware/manufacturer (i.e. 10.10.0.XXX, etc.)
Note: It's highly recommended to set a static IP for your Pi in your router's configuration. This will vary from manufacturer to manufacturer and is not covered in this guide. A static IP ensures that you will be able to access your device reliably, without having to check your router for a new IP every so often.
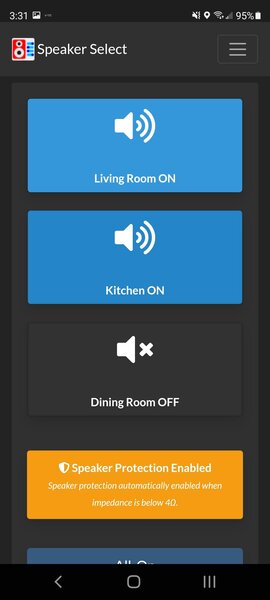
The interface / webui is broken out into two main pages. The first is the dashboard view where you can check the current status of the speaker selections. Active speakers are highlighted. There are also buttons to select ‘All On' which will turn on all speakers, and a button for ‘Default', which defaults to the your default settings.

Pressing the hamburger icon in the upper right of the interface, allows you to also access to the settings and admin screen.
In this section you have the options to:
- Configure the speakers
- Configure the relay trigger level (High / Low) - Depending on your hardware configuration, you may need to set this appropriately. Not all relay modules are active low, so this allows you to swap the triggerlevel as needed. For the PCB design with relays, this should be set to active HIGH.
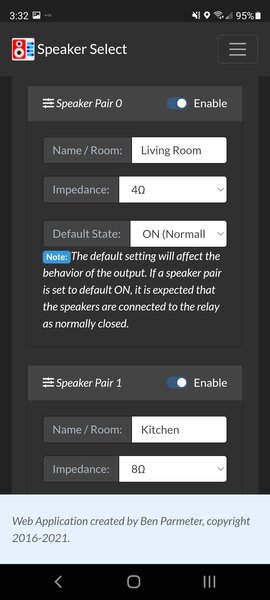
- For each speaker pair, you can enable/disable (this can hide any outputs that are inactive or unused), change the Room Name, change the impedance of the speakers (this is important for auto-speaker selection), and select the default state. For the PCB designs, the default of the main speaker being normally connected will mean that this will work even if the power is disconnected.

- IR Remote Enable / Disable - If you have configured the system to use an IR remote, this can be enabled here. Additional information is linked here as well to configure your remote.
- Theme Settings - Choose your theming options: - Select Static Theming (light or dark) which is enabled at all times.
- Select Auto-Theme based on your location's sunrise/sunset. Enter your city/country and save settings to enable.
- Local API Enable/Disable - Used for Home Assistant or any other third-party application to control the speaker selector.
- External API Enable/Disable - Exposes the /extapi route for HTTPS access. This API cannoot be accessed via insecure HTTP calls and requires an API Key for authentication.
Scrolling down further gives you the option to reboot the system or shutdown the system. Below these controls, you'll see more information about the system hardware, and the uptime.